This Mobility Coach Fixed Her Upper Back Pain With 3 Simple Moves (It Only Takes 5 Minutes)
Do you find yourself struggling to look over your shoulder while driving? Maybe you're battling with that persistent ache between your shoulder blades after a long day at work, or you can't seem to reach overhead without discomfort. These are all telltale signs of reduced thoracic mobility – a common condition that's affecting more people than ever before.
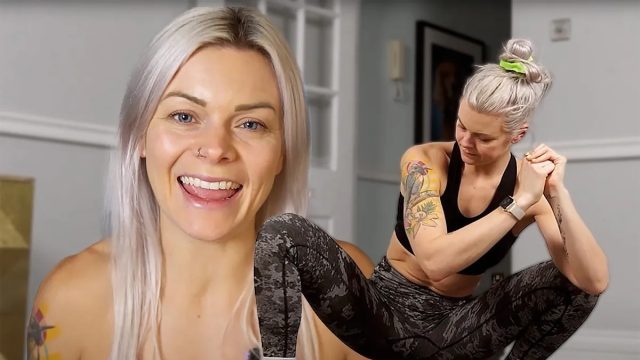
Meet Liv, a mobility expert who's transformed not only her own upper back pain but also helped her 500K YouTube subscribers discover the power of mobility-based strength training. Through her innovative 'Yoga Rebel Method,' she combines strength training and yoga to create effective, accessible solutions for everyday mobility challenges.
"You may not even realize this, but chances are you have reduced mobility in your thoracic spine," Liv explains. "That can look like stiffness in the shoulders and struggling to lift your arms overhead, or perhaps a throbbing burning pain between your shoulder blades and towards your neck after a long day at the desk."
Why These Moves Matter
"Reduced thoracic mobility has been widely studied and shown to directly correlate to increased prevalence of upper back, shoulder, and neck pain," Liv shares in her post. Instead of waiting for pain to develop, she's developed three quick, beginner-friendly exercises that can make a significant difference in just five minutes.
The Game-Changing First Move: Thoracic Pullover
"This is by far my favorite because I found it to be the most effective," Liv reveals. "It's an absolute game changer for your overhead reach and your shoulder mobility." All you need is a light weight and either a yoga block or foam roller.
RELATED: Doctor Reveals 7 Real Signs Your Body Is Actually Burning Fat
Setting Up for Success
Proper setup is crucial for this exercise. "Position the foam roller or yoga block beneath your upper back right below the point where your shoulder blades end," Liv instructs. She emphasizes keeping your "knees bent and feet on the ground so that your lower back stays in a neutral position."
Perfect Your Pullover Form
"Take your weight lengthways into both hands and reach it up towards the sky," Liv guides. The movement should be controlled and mindful. "Think of reaching the weight backwards as opposed to downward here, as if you're trying to make your arms feel as long as they possibly can."
Avoid Common Mistakes
Liv points out a crucial form tip: "Your body will naturally want your belly to press forwards to make this move easier, but unfortunately less effective." Instead, she advises to "keep a slight bit of tension in your core here to keep your lower back in neutral." Remember, "Yours does not need to look the same as mine. This just depends on your range of motion."
Advanced Pullover Options
For those looking to progress, Liv suggests using an exercise bench: "You also have the option of dropping the hips lower than the chest as the arms extend to put a greater stretch on the lats and chase some bigger mobility gains." Start with 10 repetitions, focusing on quality over quantity.
The Power of Rotation
The second exercise targets rotational mobility – a crucial movement pattern that Liv explains has surprising benefits. "Not only does this range of motion make reversing the car much easier, but training your rotational mobility is going to improve your core strength, improve your lower back health, and is likely to improve your hip mobility as well."
Master the Twist
Lying on your side with knees bent at 90 degrees, extend your weighted arm toward the ceiling. "Allow that weight to keep traveling into the twist as far as your body is capable," Liv guides. "That might be all the way to the floor or it might not. Either is fine. Everyone is different."
RELATED: She Lost 45 Pounds By Adding These 6 High-Protein Foods to Her Cart
Progress Your Rotation
For those ready for more challenge, Liv offers a progression: "If your arm quite comfortably makes it all the way to the floor and this doesn't feel too challenging for you, do this exercise with the bottom leg slid out straight. This allows the top knee to drop to the floor, creating a deeper twist in the body." Take six repetitions on each side.
The Ultimate Doorway Stretch
The final exercise, which Liv describes as "so satisfying," requires only a doorway, pole, or wall. "I love this move for how many areas it targets all at once," she shares. This comprehensive stretch brings together all elements of thoracic mobility.
Perfect Your Stretch Position
Position yourself about a forearm's distance from your chosen surface. "Take your outer leg, the one furthest away from the wall, and cross it behind the other leg, placing down onto the knife edge of the foot," Liv instructs. Then, "reach up as far as you can with the arm furthest from the wall, then reach overhead to grab the frame or simply place your fingertips onto the wall."
RELATED: Coach Unveils 40-30-20 Method for Fat Burning and Muscle Building
Maximize the Stretch
The key to this stretch is in the details: "Use the bottom hand to press the wall away from you, allowing your body to lean away from the wall into a little bit of a banana shape." Liv explains that "the top hand grips and pulls back against the frame or the pole, and then think of turning your chest up towards the ceiling to really get into that side body stretch."
Creating Lasting Change
Hold each stretch for 20-30 seconds, repeating 2-3 times per side. As Liv confirms, "In just five minutes of these moves, you can make an impactful difference to your thoracic mobility and subsequently the quality of your life and how good you feel living within your body."
Transform your upper back mobility today with these simple yet powerful exercises. As Liv's experience shows, just five minutes of focused mobility work can lead to significant improvements in how you move and feel. And if you enjoyed this article, don't miss these 3 Simple Stretches Made This Coach More Flexible in 2 Weeks.


